Comment utiliser le Communicateur Cosmique d' échelles d'onde en 2.0
Le Communicateur Cosmique d’ échelles d'onde en 2.0 est une itération de dispositifs radioniques originels dénommés « Le Communicateur Cosmique d échelles d'onde en 2.0(Scalar Wave Cosmic Communicator ou tout court SWCC v 2.0)«. Le SWCC en version 2.0 est la nouvelle génération de dispositfs radioniques de SWCC qui a toutes les fonctions du prédécesseur et un nouveau système automatique d'impression et du copiage de l'information.
SWCC en version 2.0 est capable d'imprimer et d'énergiser les cristaux thérapeutiques, les éléments d'énergie d'orgone et l'eau. Ceci dit tout élément contenant ces matériaux peut etre imprimé. Par exemple les aliments contenant de l'eau ou les bijoux contenant des cristaux thérapeutiques ainsi que les matériels à orgone, peuvent etre imprimés. Le SWCC a deux fentes conçues pour convenir aux disques d'énergie d'orgone de 65 mm de diamètre. Ces disques sont conçus pour fonctionner avec les SWCC et avec une efficacité optimale. Toutefois, vous pouvez aussi utiliser des disques à orgone ou des pyramides d'autres sources. Cependant vous devez tenir compte que chaque élément soit placé tout proche du centre de la fente, dans le meilleur des cas.
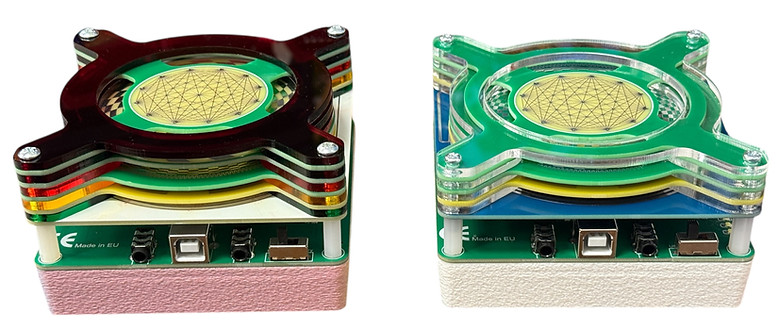
From a technical perspective, both MWO Harmonizer v1.0 and v1.2 are designed to receive an external signal and convert it into a structured scalar and electromagnetic field through their antenna and coil system. The devices can be powered either via a USB Type-B power cable or by three AA batteries, allowing for flexible use in both stationary and portable setups.
Each unit is equipped with two 3.5 mm audio ports that are linked together. A signal can be fed into either port, while the second port automatically outputs the same signal. This makes it possible to daisy-chain multiple devices using a single frequency source. In such configurations, each harmonizer functions as an independent energy emission node, and the combined system generates a stronger, more evenly distributed energetic field across a larger area.
In daisy-chained systems, the MWO Harmonizer v1.0 and v1.2 can also be used together with other compatible Aplicum devices, such as MWO Harmonizer v2.0, MWO Harmonizer v3.0, and Scalar Wave Cosmic Communicator (SWCC) units. This modular approach allows users to expand their setup gradually, combining different generations and device types into a coherent, scalable field network without changing the basic method of operation.

How to use
1. Powering the Device
The MWO Harmonizer can be powered in two different ways:
-
USB Power
Connect the device to a USB power source using a USB Type-B cable.
This can be a USB wall adapter, power bank, or computer USB port.
or
-
Battery Power
Insert three AA batteries into the battery compartment (3x 1.5V batteries).
This allows fully portable operation without any external power source.
Once power is connected, use the toggle switch to turn the device ON.
2. Connecting an Audio Signal (3.5 mm AUX)
The MWO Harmonizer operates by receiving an external audio-frequency signal, which it then converts into a structured energetic field.
-
Take a 3.5 mm AUX audio cable.
-
Connect one end to the 3.5 mm AUX port on the MWO Harmonizer.
-
Connect the other end to your signal source.
The signal source can be:
-
a smartphone or tablet
-
a computer or laptop
-
a dedicated frequency generator
-
any audio device with a 3.5 mm audio output
3. Signal Sources You Can Use
The device is highly flexible and accepts any audio-based signal, including:
-
frequency generator apps (such as Eunoia)
-
pre-recorded frequency files
-
binaural beats or tone recordings
-
music files
-
custom-generated audio signals
As long as the signal is delivered through a 3.5 mm audio output, it can be used with the MWO Harmonizer.
4. Operation Notes
-
Once powered and receiving a signal, no further adjustment is required.
-
The device immediately begins emitting the energetic field corresponding to the input signal.
-
You may adjust volume or signal strength on the source device if needed.
-
Either AUX port can be used as an input; both behave identically.
5. Basic Usage Tip
For first-time use, it is recommended to:
-
start with low to moderate volume on the signal source
-
use simple frequencies (e.g. single tones or well-known resonance frequencies)
-
allow the device to run for several minutes to experience the field effect, we recommend using them in 15 minute long sessions.
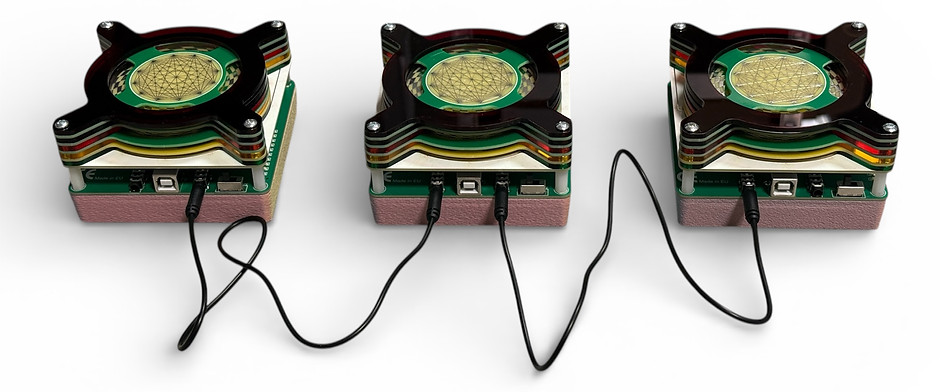
Daisy chaining several devices
Daisy-chaining multiple devices allows them to operate together as a single, synchronized system, all driven by the same audio signal. Instead of working with one localized emission point, the user creates a distributed energetic field spread across multiple devices.
This approach is especially useful in the following situations:
-
Group sessions and therapies
Multiple devices can be placed around a room, treatment table, or group of people, helping to create a more uniform and shared field during group work, meditation, or therapy sessions.
-
Larger area harmonization
Daisy-chaining is ideal for harmonizing larger spaces, such as studios, therapy rooms, living areas, or workspaces, where a single device may not provide sufficient coverage.
-
More even field distribution
By positioning several devices at different locations, the energetic influence becomes more balanced and spatially consistent, reducing strong local concentration and improving overall coherence.
-
Modular system expansion
Users can start with one device and gradually expand their setup by adding more units, without changing how the system is operated or controlled.
-
Multi-device field experiments
Advanced users may explore different placements and configurations to study how multiple synchronized emission points interact within a space.
All devices in a daisy-chained setup receive the same signal and operate simultaneously, ensuring coherent and unified operation across the entire system.
How to daisy chain several devices
To connect multiple devices together, standard 3.5 mm audio cables are used. All devices are linked so they receive the same audio signal and operate simultaneously.
Connection Procedure
-
Connect the signal source
Connect your audio signal source (such as a phone, computer, frequency generator app, or audio player) to any 3.5 mm AUX port on the first device.
-
Link the devices together
Using a 3.5 mm audio cable, connect one AUX port of the first device to one AUX port of the second device.
-
Add additional devices
Continue linking devices in the same way, connecting them together with 3.5 mm audio cables until all desired devices are connected.
-
Power the devices
Power each device individually using a USB power supply or batteries, then switch them on.
Important Notes
-
Both AUX ports on each device are functionally identical and can be used interchangeably.
-
The order of the devices does not matter.
-
Only one device needs to be connected to the signal source.
-
All connected devices will receive the same signal and operate in sync.